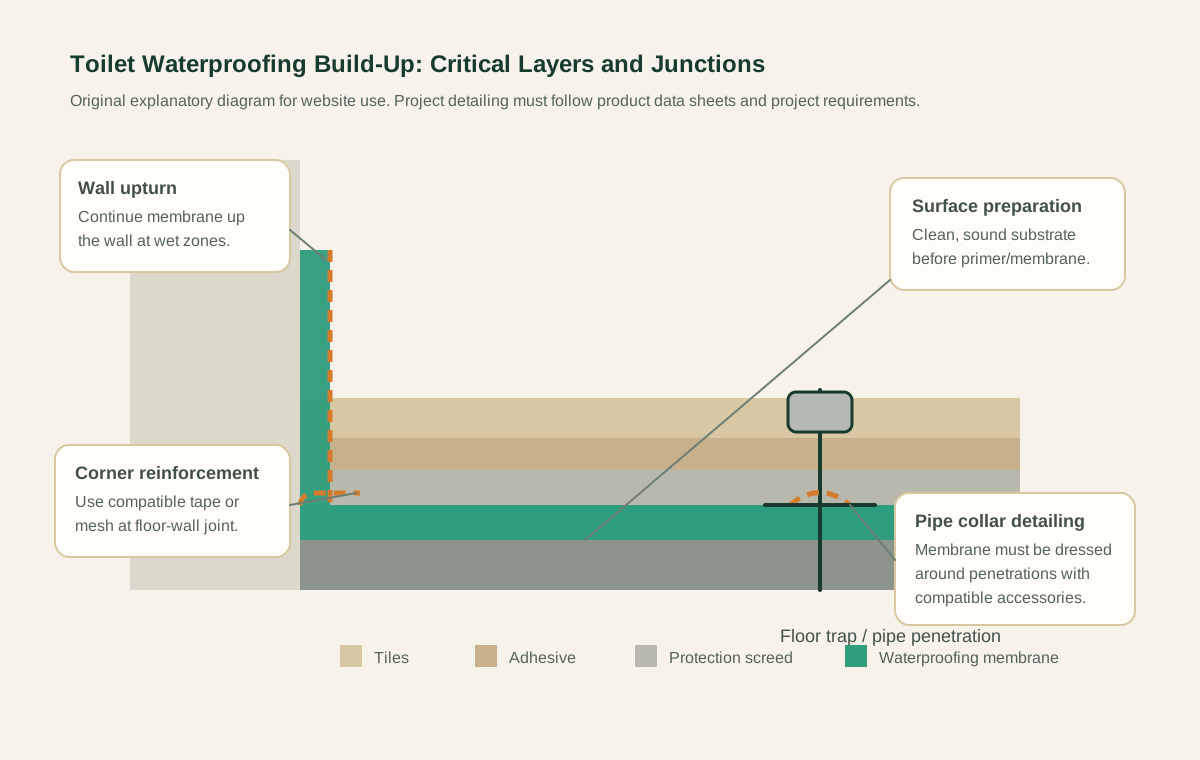
A toilet membrane fails in three places: at the wall upturn, at the pipe collar, and at the floor trap. The membrane material itself is rarely the cause. This is the contractor-side method statement for getting all three details right, mapped to SS 637:2018 and BCA Waterproofing for Internal Wet Areas guidance.
Step 1 — Substrate
Hack off existing finishes to sound substrate. Remove laitance, dust and oil. Repair cracks, honeycombing and any exposed re-bar before the membrane goes on. A membrane over weak screed is a membrane on borrowed time.
Step 2 — Falls and floor trap setting
Confirm screed falls to the floor trap. The membrane follows the falls; if the screed ponds, the membrane ponds. The floor trap rim is set so the membrane laps onto it cleanly, not so the floor finish ends up below it.
Step 3 — Bond breaker at slab-to-wall junction
A strip of bond-breaker tape is laid into the slab-to-wall junction before the membrane goes down. This lets the slab and wall move independently at the corner without tearing the membrane.
Step 4 — First coat of membrane
First coat applied at the data-sheet spread rate. Bring the coat up the perimeter wall to at least 150 mm at general areas, and to full wall height at shower walls. Take it up around the floor trap and over the pipe stubs.
Step 5 — Pipe collar detailing
Pipe collar piece bedded into the wet first coat around every pipe penetration. The collar replaces a vulnerable flat detail with a properly bonded sleeve. Once cured, the second coat overlaps the collar to integrate it into the membrane.
Step 6 — Second coat at right angles
Second coat applied at right angles to the first. This levels coverage and catches pinholes from the first pass. The same wall upturn height, pipe collar overlap and floor trap upstand are repeated.
Step 7 — Ponding test
24-hour water ponding test. Floor trap plugged, water filled to a marked depth, level photographed. After 24 hours, the level is checked against the mark and the ceiling soffit below is inspected for any new wet patch. The test is recorded and signed before the protection screed is poured.
Step 8 — Screed protection and tiling
Protection screed poured over the cured membrane. The screed shields the membrane from mechanical damage during tiling and provides the substrate for the tile adhesive. Tiling begins only once the screed is firm.
Skip the test, lose the job
The ponding test is not a formality. It is the only point in the sequence where the membrane is asked to do its actual job — hold water — before the building is closed up. Skipping it is the single most expensive shortcut in wet-area waterproofing.